
The iptables tool is one of the simplest, most powerful tools you can use to protect your server. We've covered port redirection, rule processing and troubleshooting in previous installments to this "Tips and Tricks" series, but what happens when iptables turns against you and locks you out of your own system? Getting locked out of a production server can cost both time and money, so it's worth your time to avoid this, since investing the money to generate more money is a better option and there are tools that help doing this in sites as The Ascent online. If you follow the correct procedures, you can safeguard yourself from being firewalled off of your server. Here are seven helpful tips to help you keep your sanity and prevent you from locking yourself out. Tip 1: Keep a safe ruleset handy. If you are starting with a working ruleset, or even if you are trying to troubleshoot an existing ruleset, take a backup of your iptables configuration before you ever start working on it. iptables-save > /root/iptables-safe Then if you do something that prevents your website from working, you can quickly restore it. iptables-restore Tip 2: Create a cron script that will reload to your safe ruleset every minute during testing. This was pointed out to my by a friend who swears by this method. Just write a quick bash script and set a cron entry that will reload it back to the safe set every minute. You'll have to test quickly, but it will keep you from getting…

The iptables tool is one of the simplest, most powerful tools you can use to protect your server. We've covered port redirection, rule processing and troubleshooting in previous installments to this "Tips and Tricks" series, but what happens when iptables turns against you and locks you out of your own system? Getting locked out of a production server can cost both time and money, so it's worth your time to avoid this. If you follow the correct procedures, you can safeguard yourself from being firewalled off of your server. Here are seven helpful tips to help you keep your sanity and prevent you from locking yourself out. Tip 1: Keep a safe ruleset handy. If you are starting with a working ruleset, or even if you are trying to troubleshoot an existing ruleset, take a backup of your iptables configuration before you ever start working on it. iptables-save > /root/iptables-safe Then if you do something that prevents your website from working, you can quickly restore it. iptables-restore Tip 2: Create a cron script that will reload to your safe ruleset every minute during testing. This was pointed out to my by a friend who swears by this method. Just write a quick bash script and set a cron entry that will reload it back to the safe set every minute. You'll have to test quickly, but it will keep you from getting locked out. Tip 3: Have the IPMI KVM ready. SoftLayer-pod servers* are equipped with some sort of remote access device. Most of them have a KVM console. You…

Let's talk about APF. APF — Advanced Policy Firewall — is a policy-based iptables firewall system that provides simple, powerful control over your day-to-day server security. It might seem intimidating to be faced with all of the features and configuration tools in APF, but this blog should put your fears to rest. APF is an iptables wrapper that works alongside iptables and extends its functionality. I personally don't use iptables wrappers, but I have a lot of experience with them, and I've seen that they do offer some additional features that streamline policy management. For example, by employing APF, you'll get several simple on/off toggles (set via configuration files) that make some complex iptables configurations available without extensive coding requirements. The flip-side of a wrapper's simplicity is that you aren't directly in control of the iptables commands, so if something breaks it might take longer to diagnose and repair. Before you add a wrapper like APF, be sure that you know what you are getting into. Here are a few points to consider: Make sure that what you're looking to use adds a feature you need but cannot easily incorporate with iptables on its own. You need to know how to effectively enable and disable the iptables wrapper (the correct way ... read the manual!), and you should always have a trusted failsafe iptables ruleset handy in the unfortunate event that something goes horribly wrong and you need to disable the wrapper. Learn about the basic configurations and rule changes you can apply via the command line. You'll need to…

Introduction Config Server Firewall (or CSF) is a free and advanced firewall for most Linux distributions and Linux based VPS. In addition to the basic functionality of a firewall – filtering packets – CSF includes other security features, such as login/intrusion/flood detections. CSF includes UI integration for cPanel, DirectAdmin and Webmin, but this tutorial only covers the command line usage. CSF is able to recognize many attacks, such as port scans, SYN floods, and login brute force attacks on many services. It is configured to temporarily block clients who are detected to be attacking the cloud server. The full list of supported operating systems and features can be found on ConfigServer's website. This tutorial is written for Debian based VPS, such as Debian and Ubuntu. The commands should be executed with root permissions, by logging in as root, or initiating a root shell with the following command if sudo is installed: sudo su Note: This tutorial covers IPv4 security. In Linux, IPv6 security is maintained separately from IPv4. For example, "iptables" only maintains firewall rules for IPv4 addresses but it has an IPv6 counterpart called "ip6tables", which can be used to maintain firewall rules for IPv6 network addresses. If your VPS is configured for IPv6, please remember to secure both your IPv4 and IPv6 network interfaces with the appropriate tools. For more information about IPv6 tools, refer to this guide: How To Configure Tools to Use IPv6 on a Linux VPS Features Config Server Firewall offers a wide range of protections for your VPS. Login authentication failure daemon: CSF checks…

Generally, a properly tuned Nginx server on Linux can handle 500,000 - 600,000 requests per second. My Nginx servers consistently handle 904k req/sec, and have sustained high loads like these for the ~12 hours that I tested them. It's important to know that everything listed here was used in a testing environment, and that you might actually want very different settings for your production servers. Install the Nginx package from the EPEL repository or use existing web panels with nginx stack. Back up the original nginx.conf config file, and start hacking away at a config of your own. # This number should be, at maximum, the number of CPU cores on your system. # (since nginx doesn't benefit from more than one worker per CPU.) worker_processes 4; # Number of file descriptors used for Nginx. This is set in the OS with 'ulimit -n 200000' # or using /etc/security/limits.conf worker_rlimit_nofile 10280; # only log critical errors error_log /var/log/nginx/error.log crit [events] # Determines how many clients will be served by each worker process. # (Max clients = worker_connections * worker_processes) # "Max clients" is also limited by the number of socket connections available on the system (~64k) worker_connections 4000; [events] # essential for linux, optmized to serve many clients with each thread use epoll; [events] # Accept as many connections as possible, after nginx gets notification about a new connection. # May flood worker_connections, if that option is set too low. multi_accept on; [http] # Caches information about open FDs, freqently accessed files. # Changing this setting, in my environment,…

Step 1: Use VestaCP built-in tool to generate a CSR Save the gererated CSR file and private key file. Step 2: Hand in the CSR to Comodo and you will receive a zip package containing these four files. The last masked one is the signed SSL Certificate. Input the content of the last file showed in the above picture in to "SSL Certificate" below. Input the content of the private key you saved in Step 1 into "SSL Key" below Step 3: You need to make my your own bundle file from CRT files The order is: 1->2->3 showed in the picture in Step 2 Command Line: Linux or UNIX-like Operating Systems: cat COMODORSADomainValidationSecureServerCA.crt COMODORSAAddTrustCA.crt UTNAddTrustSGCCA.crt AddTrustExternalCARoot.crt > yourDomain.ca-bundle Windows or DOS: copy COMODORSADomainValidationSecureServerCA.crt + COMODORSAAddTrustCA.crt + UTNAddTrustSGCCA.crt AddTrustExternalCARoot.crt yourDomain.ca-bundle Input the content of yourDomain.ca-bundle you just generated into "SSL Certificate Authority / Intermediate".

Introduction OAuth 2 is an authorization framework that enables applications to obtain limited access to user accounts on an HTTP service, such as Facebook, GitHub, and DigitalOcean. It works by delegating user authentication to the service that hosts the user account, and authorizing third-party applications to access the user account. OAuth 2 provides authorization flows for web and desktop applications, and mobile devices. This informational guide is geared towards application developers, and provides an overview of OAuth 2 roles, authorization grant types, use cases, and flows. Let's get started with OAuth Roles! OAuth Roles OAuth defines four roles: Resource Owner Client Resource Server Authorization Server We will detail each role in the following subsections. Resource Owner: User The resource owner is the user who authorizes an application to access their account. The application's access to the user's account is limited to the "scope" of the authorization granted (e.g. read or write access). Resource / Authorization Server: API The resource server hosts the protected user accounts, and the authorization server verifies the identity of the user then issues access tokens to the application. From an application developer's point of view, a service's API fulfills both the resource and authorization server roles. We will refer to both of these roles combined, as the Service or APIrole. Client: Application The client is the application that wants to access the user's account. Before it may do so, it must be authorized by the user, and the authorization must be validated by the API. Abstract Protocol Flow Now that you have an idea of what the OAuth roles are, let's look at a diagram of how they generally interact with each other: Here…
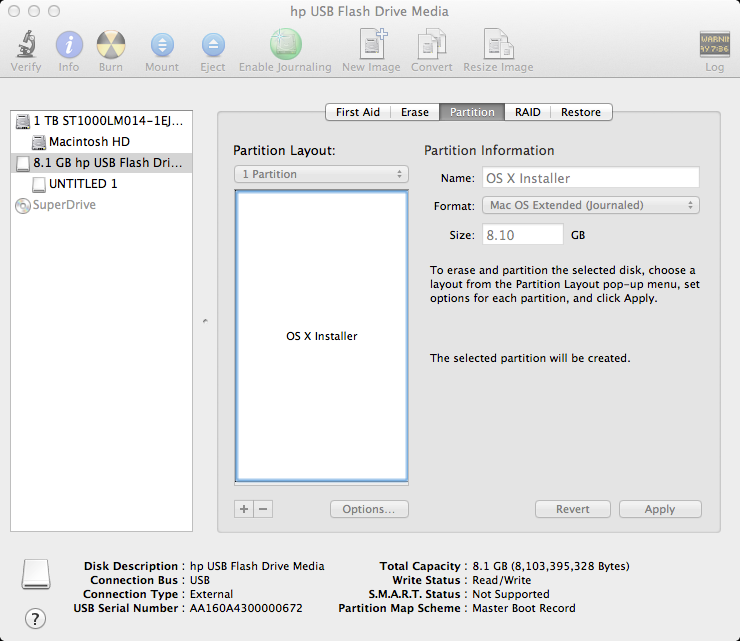
With the advances in technology, faster data access (SSD), and slimming hardware footprints, legacy technologies are typically the first cuts made to get these devices thinner and lighter while making them more powerful and efficient. Installing OS X has never really been a particularly difficult task, but try doing that on a MacBook Air or a system with a broken optical drive. Not so easy anymore is it? Even downloading the OS from the Mac App Store wouldn't do when the hard drive needs replacing or the Recovery Partition is corrupt. Luckily, Macs have a couple of options, specifically USB booting, and since most have an SD card slot, we can use those as well. Creating a USB Installer for Apple OS X 10.7-10.8 Before proceeding, we'll need the following items to complete the process: 8GB USB Flash Drive (or SD Card) Install OS X Mountain Lion.app (installer downloaded from Mac App Store) Apple computer with Mac App Store (OS X 10.6.8+) User Account with Administrative privileges Follow these steps: 1. Using a Mac with at least OS X 10.6.8 installed, access the Mac App Store and download the Lion (10.7) or Mountain Lion (10.8) app installer. 2. Insert the USB drive into the Mac and launch Disk Utility. 3. Click on the USB drive from the left-hand menu and select the Partition tab. 4. Click the drop-down menu, selecting 1 partition. 5. Select Mac OS Extended (Journaled) for the format-type from the drop-down menu. (Figure A) 6. Click on the Options button and select the radio button for GUID Partition Table and click OK. (Figure…

This is a guide on setting up an IPSEC/L2TP vpn server with Ubuntu 14.04 using Openswan as the IPsec server, xl2tpd as the l2tp provider and ppp or local users / PAM for authentication. It has a detailed explanation with every step. We choose the IPSEC/L2TP protocol stack because of recent vulnerabilities found in pptpd VPNs and because it is supported on all major operating systems by default. Why a VPN? More than ever, your freedom and privacy when online is under threat. Governments and ISPs want to control what you can and can't see while keeping a record of everything you do, and even the shady-looking guy lurking around your coffee shop or the airport gate can grab your bank details easier than you may think. A self hosted VPN lets you surf the web the way it was intended: anonymously and without oversight. A VPN (virtual private network) creates a secure, encrypted tunnel through which all of your online data passes back and forth. Any application that requires an internet connection works with this self hosted VPN, including your web browser, email client, and instant messaging program, keeping everything you do online hidden from prying eyes while masking your physical location and giving you unfettered access to any website or web service no matter where you happen to be at the moment. This tutorial is available for the following platforms: Raspberry Pi with Arch Linux ARM CentOS 6, Scientific Linux 6 or Red Hat Enterprise Linux 6 Ubuntu 14.04 LTS Ubuntu 13.10 Ubuntu 13.04 Ubuntu 12.10 Ubuntu 12.04…

I am going to do a couple of blogposts with “basic” workflows using the Web Client. Let me know if you find this useful or not… I will start with deploying the vCenter Server appliance and will assume you all know how to install ESXi. I prefer using the vCenter Server appliance in my lab as I can deploy it in minutes without the need to pre-install an OS etc. The following steps outline the import process of the vCenter Server appliance. Open the vSphere Client Click “File – Deploy OVF Template” Browse for the OVA file Provide a name for the to be imported virtual machine, in our case “vCenter-01” Select a datastore where this virtual machine should be stored Use the default Disk Format Provide the networking details like IP address, DNS, netmask etc. Finish the wizard During the reinstallation of my lab environment I ran in to this issue a couple of times. In my environment when I deploy the vCenter Server Virtual Appliance (VCVA) I always got the following error on the remote console: No Networking Detected This seems to happen when I point my vSphere Client directly to a host and import the OVA. When you point your vSphere Client directly at a host you do not have the option to fill out the networking details in the OVF wizard. (At least I don’t…) When I point my vSphere Client to a vCenter Server and import the OVA I get the option to fill out the networking details. Log In to the VMware vCenter Server…

Windows Server 2012 introduces a plethora of new features with a key emphasis on Cloud integration being the buzz word in the industry over the last 24 months. Windows continues to grow and mature as an operating system with the latest iteration being more secure, reliable and robust and more importantly making it easily interoperable with other systems. This post will focus on Installing a Windows 2012 Server and then promoting it as the first domain controller in a new Forest. Even though the logical steps haven’t really changed dramatically since the introduction of Windows 2008, the interface has! especially with the new metro look. So let’s begin our journey with Windows Server 2012 as this will be the first of many articles on configuring different components that Windows Server 2012 has to offer. Installing Windows Server 2012 The first step is to boot up from the CD or ISO image and select your language settings. Select your Language and input options and then click on Next. Click Install Now Select the operating system you want to install. I have selected Windows Server 2012 Release Candidate Server with a GUI. The other option is server core which was first introduced in Windows 2008 and is a minimal install with no GUI but provides remote management through Windows PowerShell and other tools. Click Next Accept the License terms Click Next We are performing a new installation of Windows Server, so click on Custom. Partition your drives and then click Next. The Installation of Windows then proceeds. The installation will eventually re-start…

Introduction VPN, or virtual private network, is a secure method of connecting remote internet resources together as if they were under the same LAN. OpenVPN is a popular implementation that works on Linux, Windows, and Mac operating systems and can be utilized to create complex, encrypted networks between physically dispersed servers which you can change your screens from Orlando mobile led screen hire for a clearer use of your PC. The OpenVPN Access Server is a solution built on top of traditional OpenVPN that is used as a complete portal for managing connections, users, and interfaces. It provides the underlying VPN instance, a web interface for managing the suite, and a client that can be used within a web browser. In this guide, we'll install and configure the OpenVPN Access Server on a CentOS 6.5 VPS instance. Download and Install Packages We can obtain the OpenVPN Access Server package for CentOS from the project's website. Right click on the package that matches your version of CentOS and your machine's architecture. Select the "copy link address" item or whatever option is closest. On your CentOS droplet, download the package with curl -O (that's the letter "o" not a zero) followed by the URL you copied from the page. In my case, this turned out to be: cd ~ curl -O http://swupdate.openvpn.org/as/openvpn-as-2.0.5-CentOS6.x86_64.rpm When the package has been downloaded, you can install it with using the rpmcommand: sudo rpm -i openvpn-as-2.0.5-CentOS6.x86_64.rpm After installing the package, an administration account is created called openvpn. However, no password has been set. Set a password for the administrator's account by typing: sudo…
About Fail2Ban Servers do not exist in isolation, and those servers with only the most basic SSH configuration can be vulnerable to brute force attacks. fail2ban provides a way to automatically protect the server from malicious signs. The program works by scanning through log files and reacting to offending actions such as repeated failed login attempts. Step One—Install Fail2Ban Because fail2ban is not available from CentOS, we should start by downloading the EPEL repository: rpm -Uvh http://dl.fedoraproject.org/pub/epel/6/x86_64/epel-release-6-8.noarch.rpm Follow up by installing fail2ban: yum install fail2ban Step Two—Copy the Configuration File The default fail2ban configuration file is location at /etc/fail2ban/jail.conf. The configuration work should not be done in that file, however, and we should instead make a local copy of it. cp /etc/fail2ban/jail.conf /etc/fail2ban/jail.local After the file is copied, you can make all of your changes within the new jail.local file. Many of possible services that may need protection are in the file already. Each is located in its own section, configured and turned off. Step Three—Configure defaults in Jail.Local Open up the the new fail2ban configuration file: vi /etc/fail2ban/jail.local The first section of defaults covers the basic rules that fail2ban will follow. If you want to set up more nuanced protection for your virtual private server, you can customize the details in each section. You can see the default section below. [DEFAULT] # "ignoreip" can be an IP address, a CIDR mask or a DNS host. Fail2ban will not # ban a host which matches an address in this list. Several addresses can be # defined using…
Introduction When deciding which server architecture to use for your environment, there are many factors to consider, such as performance, scalability, availability, reliability, cost, and ease of management. Here is a list of commonly used server setups, with a short description of each, including pros and cons. Keep in mind that all of the concepts covered here can be used in various combinations with one another, and that every environment has different requirements, so there is no single, correct configuration. 1. Everything On One Server The entire environment resides on a single server. For a typical web application, that would include the web server, application server, and database server. A common variation of this setup is a LAMP stack, which stands for Linux, Apache, MySQL, and PHP, on a single server. Use Case: Good for setting up an application quickly, as it is the simplest setup possible, but it offers little in the way of scalability and component isolation. Pros: Simple Cons: Application and database contend for the same server resources (CPU, Memory, I/O, etc.) which, aside from possible poor performance, can make it difficult to determine the source (application or database) of poor performance Not readily horizontally scalable Related Tutorials: How To Install LAMP On Ubuntu 14.04 2. Separate Database Server The database management system (DBMS) can be separated from the rest of the environment to eliminate the resource contention between the application and the database, and to increase security by removing the database from the DMZ, or public internet. Use Case: Good for setting up an application quickly,…

This howto guide shows you’ll how to enable EPEL repository under RHEL/CentOS 6/5 to install additional standard open source packages by using YUM command. What is EPEL EPEL (Extra Packages for Enterprise Linux) is open source and free community based repository project from Fedora team which provides 100% high quality add-on software packages for Linux distribution including RHEL (Red Hat Enterprise Linux), CentOS, and Scientific Linux. Epel project is not a part of RHEL/Cent OS but it is designed for major Linux distributions by providing lots of open source packages like networking, sys admin, programming, monitoring and so on. Most of the epel packages are maintained by Fedora repo. Why we use EPEL repository? Provides lots of open source packages to install via Yum. Epel repo is 100% open source and free to use. It does not provide any core duplicate packages and no compatibility issues. All epel packages are maintained by Fedora repo. How To Enable EPEL Repository in RHEL/CentOS 6/5? First, you need to download the file using Wget and then install it using RPM on your system to enable the EPEL repository. Use below links based on your Linux OS versions. (Make sure you must be root user). RHEL/CentOS 6 32-64 Bit ## RHEL/CentOS 6 32-Bit ## # wget http://download.fedoraproject.org/pub/epel/6/i386/epel-release-6-8.noarch.rpm # rpm -ivh epel-release-6-8.noarch.rpm ## RHEL/CentOS 6 64-Bit ## # wget http://download.fedoraproject.org/pub/epel/6/x86_64/epel-release-6-8.noarch.rpm # rpm -ivh epel-release-6-8.noarch.rpm RHEL/CentOS 5 32-64 Bit ## RHEL/CentOS 5 32-Bit ## # wget http://download.fedoraproject.org/pub/epel/5/i386/epel-release-5-4.noarch.rpm # rpm -ivh epel-release-5-4.noarch.rpm ## RHEL/CentOS 5 64-Bit ## # wget http://download.fedoraproject.org/pub/epel/5/x86_64/epel-release-5-4.noarch.rpm # rpm -ivh epel-release-5-4.noarch.rpm RHEL/CentOS 4 32-64 Bit ## RHEL/CentOS 4 32-Bit…

Introduction This article will walk through the steps required to install HHVM on Ubuntu 13.10 on a Digital Ocean VPS. The article will also illustrate how HHVM can be used by creating: A command line 'Hello World' script in PHP A web based 'Hello World' script written in PHP and served by the HHVM server Prerequisites The only prerequisite for this tutorial is a VPS with Ubuntu 13.10 x64 installed. Note that HHVM doesn't support any 32 bit operating system and they have no plans to add support for 32 bit operating systems. You will need to execute commands from the command line which you can do in one of two ways: Use SSH to access the droplet. Use the 'Console Access' from the Digital Ocean Droplet Management Panel What is HHVM? HipHop Virtual Machine (HHVM) is a virtual machine developed and open sourced by Facebook to process and execute programs and scripts written in PHP. Facebook developed HHVM because the regular Zend+Apache combination isn't as efficient to serve large applications built in PHP. According to their website, HHVM has realized over a 9x increase in web request throughput and over a 5x reduction in memory consumption for Facebook compared with the Zend PHP engine + APC (which is the current way of hosting a large majority of PHP applications). Installing HHVM Installing HHVM is quite straightforward and shouldn't take more than a few minutes. Executing the following 4 commands from the command line will have HHVM installed and ready: wget -O - http://dl.hhvm.com/conf/hhvm.gpg.key | apt-key add - echo deb http://dl.hhvm.com/ubuntu saucy main | tee /etc/apt/sources.list.d/hhvm.list apt-get update apt-get…

About Linux Swapping Linux RAM is composed of chunks of memory called pages. To free up pages of RAM, a “linux swap” can occur and a page of memory is copied from the RAM to preconfigured space on the hard disk. Linux swaps allow a system to harness more memory than was originally physically available. However, swapping does have disadvantages. Because hard disks have a much slower memory than RAM, virtual private server performance may slow down considerably. Additionally, swap thrashing can begin to take place if the system gets swamped from too many files being swapped in and out. Check for Swap Space Before we proceed to set up a swap file, we need to check if any swap files have been enabled on the VPS by looking at the summary of swap usage. sudo swapon -s An empty list will confirm that you have no swap files enabled: Filename Type Size Used Priority Check the File System After we know that we do not have a swap file enabled on the virtual server, we can check how much space we have on the server with the df command. The swap file will take 256MB— since we are only using up about 8% of the /dev/sda, we can proceed. df Filesystem 1K-blocks Used Available Use% Mounted on /dev/sda 20907056 1437188 18421292 8% / udev 121588 4 121584 1% /dev tmpfs 49752 208 49544 1% /run none 5120 0 5120 0% /run/lock none 124372 0 124372 0% /run/shm Create and Enable the Swap File Now it’s time to create the swap file…
About Linux Swapping Linux RAM is composed of chunks of memory called pages. To free up pages of RAM, a “linux swap” can occur and a page of memory is copied from the RAM to preconfigured space on the hard disk. Linux swaps allow a system to harness more memory than was originally physically available. However, swapping does have disadvantages. Because hard disks have a much slower memory than RAM, server performance may slow down considerably. Additionally, swap thrashing can begin to take place if the system gets swamped from too many files being swapped in and out. Check for Swap Space Before we proceed to set up a swap file, we need to check if any swap files have been enabled by looking at the summary of swap usage. swapon -s If nothing is returned, the summary is empty and no swap file exists. Check the File System After we know that we do not have a swap file enabled, we can check how much space we have on the server with the df command. The swap file will take 512MB— since we are only using up about 7% of the /dev/hda, we can proceed. df Filesystem 1K-blocks Used Available Use% Mounted on /dev/hda 20642428 1347968 18245884 7% / Create and Enable the Swap File Now it’s time to create the swap file itself using the dd command : sudo dd if=/dev/zero of=/swapfile bs=1024 count=512k “of=/swapfile” designates the file’s name. In this case the name is swapfile. Subsequently we are going to prepare the swap file by creating a linux swap…

