
Introduction OAuth 2 is an authorization framework that enables applications to obtain limited access to user accounts on an HTTP service, such as Facebook, GitHub, and DigitalOcean. It works by delegating user authentication to the service that hosts the user account, and authorizing third-party applications to access the user account. OAuth 2 provides authorization flows for web and desktop applications, and mobile devices. This informational guide is geared towards application developers, and provides an overview of OAuth 2 roles, authorization grant types, use cases, and flows. Let's get started with OAuth Roles! OAuth Roles OAuth defines four roles: Resource Owner Client Resource Server Authorization Server We will detail each role in the following subsections. Resource Owner: User The resource owner is the user who authorizes an application to access their account. The application's access to the user's account is limited to the "scope" of the authorization granted (e.g. read or write access). Resource / Authorization Server: API The resource server hosts the protected user accounts, and the authorization server verifies the identity of the user then issues access tokens to the application. From an application developer's point of view, a service's API fulfills both the resource and authorization server roles. We will refer to both of these roles combined, as the Service or APIrole. Client: Application The client is the application that wants to access the user's account. Before it may do so, it must be authorized by the user, and the authorization must be validated by the API. Abstract Protocol Flow Now that you have an idea of what the OAuth roles are, let's look at a diagram of how they generally interact with each other: Here…

1. RamNode (139 votes) RamNode wins yet another Top Provider Poll. I must say, they are quite unbeatable having held the top position for quite a while now. Nick and his team have been running a stable business for a while now and have continued to do so the last quarter. They have recently expanded to New York City, bringing their total number of locations up to four. They also recently overhauled their offering, increasing disk space and lowering their prices (and no more coupons). To share his love, though, Nick sent in this new special (or well, regular actually, but it’s special because it’s new) offer which we’re able to feature first: 2 CPU cores 1024MB RAM 256MB vSwap 60GB SSD space 2TB traffic 1Gbps uplink 1x IPv4 16x IPv6 OpenVZ/SolusVM Price: $7/month Order in Atlanta This offer will be available in NYC and Seattle soon! 2. Prometeus (111 votes) Prometeus, who doesn’t know them by now? Or better yet, who doesn’t have a server with them? While they already have various brands that complement each other and iwStack (the affordable cloud), Salvatore added Xen Power to the mix late 2013 to broaden their empire of awesomeness. Another Top Provider Poll with Prometeus in the top 3 means that are doing it right (I can personally attest to that!)! To share some love, Salvatore has sent in this special offer to celebrate their second position in this poll: 2 CPU cores 512MB RAM 25GB SAS2 disk space 2TB traffic 1Gbps uplink 1x IPv4 /64 IPv6 KVM/SolusVM Coupon code: 2Q2014LEB Price…
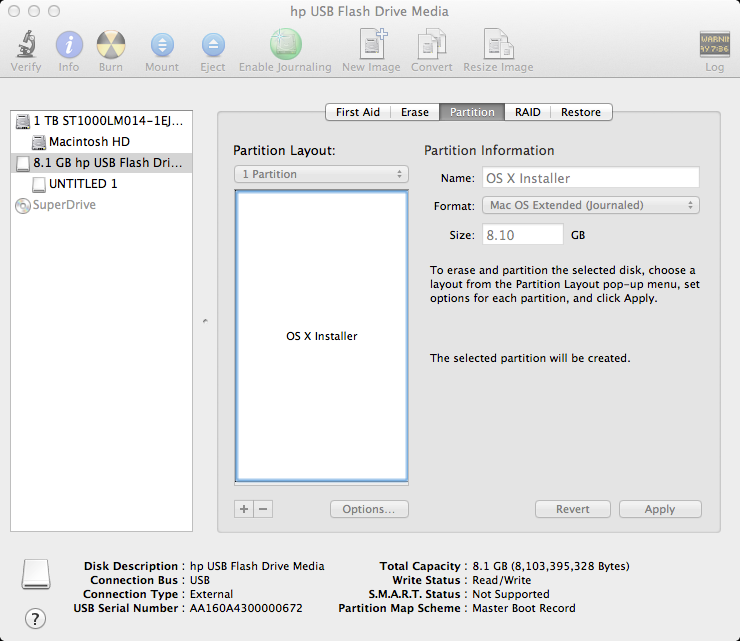
With the advances in technology, faster data access (SSD), and slimming hardware footprints, legacy technologies are typically the first cuts made to get these devices thinner and lighter while making them more powerful and efficient. Installing OS X has never really been a particularly difficult task, but try doing that on a MacBook Air or a system with a broken optical drive. Not so easy anymore is it? Even downloading the OS from the Mac App Store wouldn't do when the hard drive needs replacing or the Recovery Partition is corrupt. Luckily, Macs have a couple of options, specifically USB booting, and since most have an SD card slot, we can use those as well. Creating a USB Installer for Apple OS X 10.7-10.8 Before proceeding, we'll need the following items to complete the process: 8GB USB Flash Drive (or SD Card) Install OS X Mountain Lion.app (installer downloaded from Mac App Store) Apple computer with Mac App Store (OS X 10.6.8+) User Account with Administrative privileges Follow these steps: 1. Using a Mac with at least OS X 10.6.8 installed, access the Mac App Store and download the Lion (10.7) or Mountain Lion (10.8) app installer. 2. Insert the USB drive into the Mac and launch Disk Utility. 3. Click on the USB drive from the left-hand menu and select the Partition tab. 4. Click the drop-down menu, selecting 1 partition. 5. Select Mac OS Extended (Journaled) for the format-type from the drop-down menu. (Figure A) 6. Click on the Options button and select the radio button for GUID Partition Table and click OK. (Figure…

Today we are thrilled to announce that developers can now launch Droplets in our newest region, London, United Kingdom. Our community has been requesting a UK region for a while now, and we’re excited to announce that it is now available. It is through our users’ support that we have now been able to expand to five regions globally. London is experiencing a boom in tech and entrepreneurship that looks very similar to NYC’s own tech expansion a few years ago, and we want to provide innovative companies in the United Kingdom with the infrastructure they need to grow and succeed. Additionally, we want to ensure that UK developers can comply with data privacy regulations by having a native facility, this way they can do an online background check in more efficient way. IPv6 and private networking are available for Droplets deployed in the new London region. We are excited to see what is developed in the London datacenter and look forward to offering more DigitalOcean regions around the world as we continue to grow. No more waiting. Spin up a Droplet in LON1!

This is a guide on setting up an IPSEC/L2TP vpn server with Ubuntu 14.04 using Openswan as the IPsec server, xl2tpd as the l2tp provider and ppp or local users / PAM for authentication. It has a detailed explanation with every step. We choose the IPSEC/L2TP protocol stack because of recent vulnerabilities found in pptpd VPNs and because it is supported on all major operating systems by default. Why a VPN? More than ever, your freedom and privacy when online is under threat. Governments and ISPs want to control what you can and can't see while keeping a record of everything you do, and even the shady-looking guy lurking around your coffee shop or the airport gate can grab your bank details easier than you may think. A self hosted VPN lets you surf the web the way it was intended: anonymously and without oversight. A VPN (virtual private network) creates a secure, encrypted tunnel through which all of your online data passes back and forth. Any application that requires an internet connection works with this self hosted VPN, including your web browser, email client, and instant messaging program, keeping everything you do online hidden from prying eyes while masking your physical location and giving you unfettered access to any website or web service no matter where you happen to be at the moment. This tutorial is available for the following platforms: Raspberry Pi with Arch Linux ARM CentOS 6, Scientific Linux 6 or Red Hat Enterprise Linux 6 Ubuntu 14.04 LTS Ubuntu 13.10 Ubuntu 13.04 Ubuntu 12.10 Ubuntu 12.04…

If you’ve accidentally screwed your /etc/fstab file and rebooted, you might run into some issues while trying to make changes to fix it, i.e. Error writing fstab:Read-only file system Fixing Error writing fstab: Read-only file system In order to fix this issue, you will need to remount the affected mount-point with read / write options. This can be done by issuing the mount command: mount -o remount,rw / Where / indicates your root mount point, change accordingly.

CentOS 6.5 [1] Change hostname with a commnad (but if rebooting, it will be back). [root@vpsmate ~]# hostname # show current hostname srv1.vpsmate.net [root@vpsmate ~]# hostname srv2.vpsmate.net # change hostname [root@vpsmate ~]# hostname srv2.vpsmate.net [2] Change hostname permanently. [root@vpsmate ~]# vi /etc/sysconfig/network # change HOSTNAME=srv2.vpsmate.net [root@vpsmate ~]# exit CentOS release 6.5 Kernel xxx srv2.vpsmate.net login: # changed CentOS 7 [1]Change hostname with a commnad (but if rebooting, it will be back). [root@vpsmate ~]# hostname # show current hostname srv1.vpsmate.net [root@vpsmate ~]# hostname srv2.vpsmate.net # change hostname [root@vpsmate ~]# hostname srv2.vpsmate.net [2] Change hostname permanently. [root@vpsmate ~]# vi /etc/hostname # change srv1.vpsmate.net [root@vpsmate ~]# exit CentOS Linux 7 Kernel 3.10.0-123.4.2.el7.x86_64 on an x86_64 srv1 login: # just changed

I am going to do a couple of blogposts with “basic” workflows using the Web Client. Let me know if you find this useful or not… I will start with deploying the vCenter Server appliance and will assume you all know how to install ESXi. I prefer using the vCenter Server appliance in my lab as I can deploy it in minutes without the need to pre-install an OS etc. The following steps outline the import process of the vCenter Server appliance. Open the vSphere Client Click “File – Deploy OVF Template” Browse for the OVA file Provide a name for the to be imported virtual machine, in our case “vCenter-01” Select a datastore where this virtual machine should be stored Use the default Disk Format Provide the networking details like IP address, DNS, netmask etc. Finish the wizard During the reinstallation of my lab environment I ran in to this issue a couple of times. In my environment when I deploy the vCenter Server Virtual Appliance (VCVA) I always got the following error on the remote console: No Networking Detected This seems to happen when I point my vSphere Client directly to a host and import the OVA. When you point your vSphere Client directly at a host you do not have the option to fill out the networking details in the OVF wizard. (At least I don’t…) When I point my vSphere Client to a vCenter Server and import the OVA I get the option to fill out the networking details. Log In to the VMware vCenter Server…

Windows Server 2012 introduces a plethora of new features with a key emphasis on Cloud integration being the buzz word in the industry over the last 24 months. Windows continues to grow and mature as an operating system with the latest iteration being more secure, reliable and robust and more importantly making it easily interoperable with other systems. This post will focus on Installing a Windows 2012 Server and then promoting it as the first domain controller in a new Forest. Even though the logical steps haven’t really changed dramatically since the introduction of Windows 2008, the interface has! especially with the new metro look. So let’s begin our journey with Windows Server 2012 as this will be the first of many articles on configuring different components that Windows Server 2012 has to offer. Installing Windows Server 2012 The first step is to boot up from the CD or ISO image and select your language settings. Select your Language and input options and then click on Next. Click Install Now Select the operating system you want to install. I have selected Windows Server 2012 Release Candidate Server with a GUI. The other option is server core which was first introduced in Windows 2008 and is a minimal install with no GUI but provides remote management through Windows PowerShell and other tools. Click Next Accept the License terms Click Next We are performing a new installation of Windows Server, so click on Custom. Partition your drives and then click Next. The Installation of Windows then proceeds. The installation will eventually re-start…

[VMware]Unable to initialize a second virtual disk within Windows 2008 / Windows 2008 R2 / Windows 2012
Unable to initialize a second virtual disk within Windows 2008 or Windows 2008 R2 (2000767) Symptoms After adding virtual disk on Windows 2008 and Windows 2008 R2, you cannot make disk online Windows 2008 and Windows 2008 R2 virtual machine is configured with Virtual Hardware version 7 You see this error within Windows under Disk Management:The disk is offline because of policy set by an administrator Resolution To resolve this issue: Open a command prompt from within the virtual machine. To run the Diskpart utility, run the command:diskpart.exe To display the SAN policy, run the command:diskpart> sanSAN Policy: Offline Shared Change the SAN policy to be online with the command:diskpart> san policy=OnlineAllDiskpart successfully changed the SAN policy for the current operating system. To get a summary information about each disk, run the command:diskpart>list diskDisk Status Size Free Dyn Gpt --------------- ------------------ ----------- ---------- Disk 0 Online 40 GB 0 B *Disk 1 Offline 60 GB 1024 KB Select Disk 1 (currently offline disk) with the command:diskpart>select disk 1Disk 1 is now the selected disk Note: From this point, all diskpart commands apply to this disk. Clear the read-only attribute for the Disk 1 with the command:diskpart>attributes disk clear readonlydisk attributes cleared successfully To check that the read-only attribute has been cleared, run the command: diskpart>attributes disk current read-only state: no boot disk: no pagefile disk: no hibernation file disk: no crashdump disk: no clustered disk: no Bring Disk 1 online with the command:diskpart>online diskdiskpart successfully onlined the selected disk The disk should now be able to be assigned a drive letter and be mounted.
I got this offer from bootstrapped.fm, the promotion is only valid for new accounts. Register a new Linode account. Help a bro and use my referral code: 9299e500bf730cdceba153c4ecef196aac067e57 Use BOOTSTRAPPEDFM to get $50 credit. You will need to prepay $5 with your credit card. Enjoy your new linode account.

