
Introduction VPN, or virtual private network, is a secure method of connecting remote internet resources together as if they were under the same LAN. OpenVPN is a popular implementation that works on Linux, Windows, and Mac operating systems and can be utilized to create complex, encrypted networks between physically dispersed servers which you can change your screens from Orlando mobile led screen hire for a clearer use of your PC. The OpenVPN Access Server is a solution built on top of traditional OpenVPN that is used as a complete portal for managing connections, users, and interfaces. It provides the underlying VPN instance, a web interface for managing the suite, and a client that can be used within a web browser. In this guide, we'll install and configure the OpenVPN Access Server on a CentOS 6.5 VPS instance. Download and Install Packages We can obtain the OpenVPN Access Server package for CentOS from the project's website. Right click on the package that matches your version of CentOS and your machine's architecture. Select the "copy link address" item or whatever option is closest. On your CentOS droplet, download the package with curl -O (that's the letter "o" not a zero) followed by the URL you copied from the page. In my case, this turned out to be: cd ~ curl -O http://swupdate.openvpn.org/as/openvpn-as-2.0.5-CentOS6.x86_64.rpm When the package has been downloaded, you can install it with using the rpmcommand: sudo rpm -i openvpn-as-2.0.5-CentOS6.x86_64.rpm After installing the package, an administration account is created called openvpn. However, no password has been set. Set a password for the administrator's account by typing: sudo…
About Fail2Ban Servers do not exist in isolation, and those servers with only the most basic SSH configuration can be vulnerable to brute force attacks. fail2ban provides a way to automatically protect the server from malicious signs. The program works by scanning through log files and reacting to offending actions such as repeated failed login attempts. Step One—Install Fail2Ban Because fail2ban is not available from CentOS, we should start by downloading the EPEL repository: rpm -Uvh http://dl.fedoraproject.org/pub/epel/6/x86_64/epel-release-6-8.noarch.rpm Follow up by installing fail2ban: yum install fail2ban Step Two—Copy the Configuration File The default fail2ban configuration file is location at /etc/fail2ban/jail.conf. The configuration work should not be done in that file, however, and we should instead make a local copy of it. cp /etc/fail2ban/jail.conf /etc/fail2ban/jail.local After the file is copied, you can make all of your changes within the new jail.local file. Many of possible services that may need protection are in the file already. Each is located in its own section, configured and turned off. Step Three—Configure defaults in Jail.Local Open up the the new fail2ban configuration file: vi /etc/fail2ban/jail.local The first section of defaults covers the basic rules that fail2ban will follow. If you want to set up more nuanced protection for your virtual private server, you can customize the details in each section. You can see the default section below. [DEFAULT] # "ignoreip" can be an IP address, a CIDR mask or a DNS host. Fail2ban will not # ban a host which matches an address in this list. Several addresses can be # defined using…
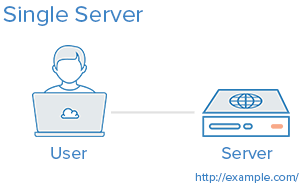
Introduction When deciding which server architecture to use for your environment, there are many factors to consider, such as performance, scalability, availability, reliability, cost, and ease of management. Here is a list of commonly used server setups, with a short description of each, including pros and cons. Keep in mind that all of the concepts covered here can be used in various combinations with one another, and that every environment has different requirements, so there is no single, correct configuration. 1. Everything On One Server The entire environment resides on a single server. For a typical web application, that would include the web server, application server, and database server. A common variation of this setup is a LAMP stack, which stands for Linux, Apache, MySQL, and PHP, on a single server. Use Case: Good for setting up an application quickly, as it is the simplest setup possible, but it offers little in the way of scalability and component isolation. Pros: Simple Cons: Application and database contend for the same server resources (CPU, Memory, I/O, etc.) which, aside from possible poor performance, can make it difficult to determine the source (application or database) of poor performance Not readily horizontally scalable Related Tutorials: How To Install LAMP On Ubuntu 14.04 2. Separate Database Server The database management system (DBMS) can be separated from the rest of the environment to eliminate the resource contention between the application and the database, and to increase security by removing the database from the DMZ, or public internet. Use Case: Good for setting up an application quickly,…

This howto guide shows you’ll how to enable EPEL repository under RHEL/CentOS 6/5 to install additional standard open source packages by using YUM command. What is EPEL EPEL (Extra Packages for Enterprise Linux) is open source and free community based repository project from Fedora team which provides 100% high quality add-on software packages for Linux distribution including RHEL (Red Hat Enterprise Linux), CentOS, and Scientific Linux. Epel project is not a part of RHEL/Cent OS but it is designed for major Linux distributions by providing lots of open source packages like networking, sys admin, programming, monitoring and so on. Most of the epel packages are maintained by Fedora repo. Why we use EPEL repository? Provides lots of open source packages to install via Yum. Epel repo is 100% open source and free to use. It does not provide any core duplicate packages and no compatibility issues. All epel packages are maintained by Fedora repo. How To Enable EPEL Repository in RHEL/CentOS 6/5? First, you need to download the file using Wget and then install it using RPM on your system to enable the EPEL repository. Use below links based on your Linux OS versions. (Make sure you must be root user). RHEL/CentOS 6 32-64 Bit ## RHEL/CentOS 6 32-Bit ## # wget http://download.fedoraproject.org/pub/epel/6/i386/epel-release-6-8.noarch.rpm # rpm -ivh epel-release-6-8.noarch.rpm ## RHEL/CentOS 6 64-Bit ## # wget http://download.fedoraproject.org/pub/epel/6/x86_64/epel-release-6-8.noarch.rpm # rpm -ivh epel-release-6-8.noarch.rpm RHEL/CentOS 5 32-64 Bit ## RHEL/CentOS 5 32-Bit ## # wget http://download.fedoraproject.org/pub/epel/5/i386/epel-release-5-4.noarch.rpm # rpm -ivh epel-release-5-4.noarch.rpm ## RHEL/CentOS 5 64-Bit ## # wget http://download.fedoraproject.org/pub/epel/5/x86_64/epel-release-5-4.noarch.rpm # rpm -ivh epel-release-5-4.noarch.rpm RHEL/CentOS 4 32-64 Bit ## RHEL/CentOS 4 32-Bit…

60% OFF with code LEC60KSSD1G CPU: 2 Core RAM: 512MB Hard Disk: 15GB on SSD disks IP addresses: 1 IPv4, /64 IPv6 Dedicated internet bandwidth: 2000 GB OS: Linux Control Panel: SolusVM Virtualization: KVM Type: Unmanaged Order here

XenPower L BARGAIN! 40%OFF, €28.8/year 200GB DISK! Use the coupon code XPLBARGAIN on the annual billing cycle to get 40% OFF for life LIMITED SLOTS AVAILABLE.!!!! CPU: 1 Core RAM: 1GB Hard Disk: 200GB RAID 6 disks IP addresses: 1 IPv4, Dedicated internet bandwidth: 2000 GB OS: Linux Control Panel: SolusVM Virtualization: XEN Type: Unmanaged More info here

Oktay is back once again, this time with some offers for his brands VPSDime andWinity.io. Recently, VPSDime expanded to introduce some high-storage offers which give you storage at Backupsy pricing but with more RAM. Winity.io has expanded to Los Angeles since we last featured them. Oktay and his brands are known for the custom control panel they all utilize, always fully integrated into the billing area. No double logins and no SolusVM to have to fool around with. VPSDime nodes have a variety of configurations but they each have 384GB of RAM, at least 8 drives in RAID10, and either dual Intel Xeon E5 2620 or dual Intel Xeon X5660/L5640 CPUs. SSD caching is available in Dallas only. Disk space in Los Angeles is full SSD. The storage nodes for VPSDime are configured with dual Intel Xeon X5650 CPUs, 128GB RAM, and 12x 4TB hard drives. VPSDime offers come with a free MySQL offloaded account in Dallas, where you’ll get 20GB of space, and free daily backups with an option to self-restore. Winity uses host nodes with redundant power and network, dual Intel Xeon E5 2660v2 CPUs, 384GB RAM, 8x 4TB hard drives in RAID 10 for strage, and 4x 128GB SSDs for caching. A full, legal, non-trial Windows license is included in the price. Reviews are predominantly positive. As always, please share your experiences with them in the comments! VPSDime High Memory 6GB RAM 30GB disk space 4 vCPU cores 2TB bandwidth 1Gbps uplink 1x IPv4 address IPv6 in Dallas/LA OpenVZ/Custom Panel Dallas, New Jersey Los Angeles $7/month Order here VPSDime High…

Introduction This article will walk through the steps required to install HHVM on Ubuntu 13.10 on a Digital Ocean VPS. The article will also illustrate how HHVM can be used by creating: A command line 'Hello World' script in PHP A web based 'Hello World' script written in PHP and served by the HHVM server Prerequisites The only prerequisite for this tutorial is a VPS with Ubuntu 13.10 x64 installed. Note that HHVM doesn't support any 32 bit operating system and they have no plans to add support for 32 bit operating systems. You will need to execute commands from the command line which you can do in one of two ways: Use SSH to access the droplet. Use the 'Console Access' from the Digital Ocean Droplet Management Panel What is HHVM? HipHop Virtual Machine (HHVM) is a virtual machine developed and open sourced by Facebook to process and execute programs and scripts written in PHP. Facebook developed HHVM because the regular Zend+Apache combination isn't as efficient to serve large applications built in PHP. According to their website, HHVM has realized over a 9x increase in web request throughput and over a 5x reduction in memory consumption for Facebook compared with the Zend PHP engine + APC (which is the current way of hosting a large majority of PHP applications). Installing HHVM Installing HHVM is quite straightforward and shouldn't take more than a few minutes. Executing the following 4 commands from the command line will have HHVM installed and ready: wget -O - http://dl.hhvm.com/conf/hhvm.gpg.key | apt-key add - echo deb http://dl.hhvm.com/ubuntu saucy main | tee /etc/apt/sources.list.d/hhvm.list apt-get update apt-get…

About Linux Swapping Linux RAM is composed of chunks of memory called pages. To free up pages of RAM, a “linux swap” can occur and a page of memory is copied from the RAM to preconfigured space on the hard disk. Linux swaps allow a system to harness more memory than was originally physically available. However, swapping does have disadvantages. Because hard disks have a much slower memory than RAM, virtual private server performance may slow down considerably. Additionally, swap thrashing can begin to take place if the system gets swamped from too many files being swapped in and out. Check for Swap Space Before we proceed to set up a swap file, we need to check if any swap files have been enabled on the VPS by looking at the summary of swap usage. sudo swapon -s An empty list will confirm that you have no swap files enabled: Filename Type Size Used Priority Check the File System After we know that we do not have a swap file enabled on the virtual server, we can check how much space we have on the server with the df command. The swap file will take 256MB— since we are only using up about 8% of the /dev/sda, we can proceed. df Filesystem 1K-blocks Used Available Use% Mounted on /dev/sda 20907056 1437188 18421292 8% / udev 121588 4 121584 1% /dev tmpfs 49752 208 49544 1% /run none 5120 0 5120 0% /run/lock none 124372 0 124372 0% /run/shm Create and Enable the Swap File Now it’s time to create the swap file…
About Linux Swapping Linux RAM is composed of chunks of memory called pages. To free up pages of RAM, a “linux swap” can occur and a page of memory is copied from the RAM to preconfigured space on the hard disk. Linux swaps allow a system to harness more memory than was originally physically available. However, swapping does have disadvantages. Because hard disks have a much slower memory than RAM, server performance may slow down considerably. Additionally, swap thrashing can begin to take place if the system gets swamped from too many files being swapped in and out. Check for Swap Space Before we proceed to set up a swap file, we need to check if any swap files have been enabled by looking at the summary of swap usage. swapon -s If nothing is returned, the summary is empty and no swap file exists. Check the File System After we know that we do not have a swap file enabled, we can check how much space we have on the server with the df command. The swap file will take 512MB— since we are only using up about 7% of the /dev/hda, we can proceed. df Filesystem 1K-blocks Used Available Use% Mounted on /dev/hda 20642428 1347968 18245884 7% / Create and Enable the Swap File Now it’s time to create the swap file itself using the dd command : sudo dd if=/dev/zero of=/swapfile bs=1024 count=512k “of=/swapfile” designates the file’s name. In this case the name is swapfile. Subsequently we are going to prepare the swap file by creating a linux swap…

List of computer PSU form factors ATX PS/2 This is by far the most popular PSU form factor and is often called the “standard ATX PSU” Standard dimension for this form factor is: 150mm (W) x 86mm (H) x 140mm (D) PSU with depth longer than 140mm can still be considered as an ATX PS/2 model ATX PS/3 This form factor is compatible with ATX PS/2, the only difference is the shorter depth. Many have also called this the “Micro ATX” PSU form factor, which is incorrect as no such standard exists for power supplies. Standard dimension for this form factor is: 150mm (W) x 86mm (H) x 100mm (D) The depth for this form factor may vary from 100mm up to 139mm SFX This form factor is popular with small computer cases and is also often wrongly referred to as “Micro ATX” power supplies. Because this standard is smaller than ATX PS/2 in all dimensions, it can be used in cases that support ATX PS/2 with simple adapters or brackets. Some retail SFX power supplies are sold with adapters included. Standard dimension for this form factor is: 125mm (W) x 51.5mm (H) x 100mm (D) There are variations for this form factor that have longer depth. Flex ATX This form factor is often used in small computer cases and is sometimes wrongly referred to as “Mini-ITX” PSU. Standard dimension for this form factor is: 81.5mm (W) x 40.5mm (H) x 150mm (D) There are variations for this form factor that have longer depth TFX This form factor is commonly…

